It all started with a love of sea glass, and all things “frosted” looking.
On Pinterest, I came across translucent polymer clay being used to mimic it. Katrin Neumaier’s jewelry caught my eye again and again. Her work takes my breath away.
After researching this (and wandering off the beaten path a bit), I found that the clay can be colored with alcohol inks to create a more lasting color and preserve the translucency in a way that adding colored opaque clay doesn’t.
So… off to look for a starter kit of alcohol inks. This wasn’t working out for me. The popular Adirondack inks come in 1/2 ounce 3-packs, with names like Bottle and Mermaid.
I’m a pushover for a great name, and YouTube tutorials with Tim Holtz have helpful tips and techniques, but since I taught Color Theory for years, I’m picky about my colors and am pretty thrifty. I didn’t want to buy colors in a 3-pack if I only wanted two of them.
Customizing/playing with colors until I’m satisfied (I can never paint a wall straight from the can) and do-it-yourself anything are two of my favorite ways to spend time. So when I also came across tutorials on Pinterest about making your own inks with Sharpies and alcohol, I couldn’t wait to try it. I know 1/2 ounce goes a long way with the inks, but being able to make more for less $$ is always appealing.
The Process
These videos by Karen Lotz told me what I needed to know about this easy process.
Making Alcohol Ink Using Sharpies Tutorial Part 2
This is where the how-to part is detailed.
Making Alcohol Ink Using Sharpies Tutorial Part 1
Part 1 focuses on the colors in her marker set, dropper bottles and storage caddy she uses.
The Cost

Markers – 80s Glam 24 marker set – $17
Walmart has a similar set, but with some repeated colors for around $10
Rubbing Alcohol – 91% strength, 2 bottles ($1.48 a bottle) – about $3
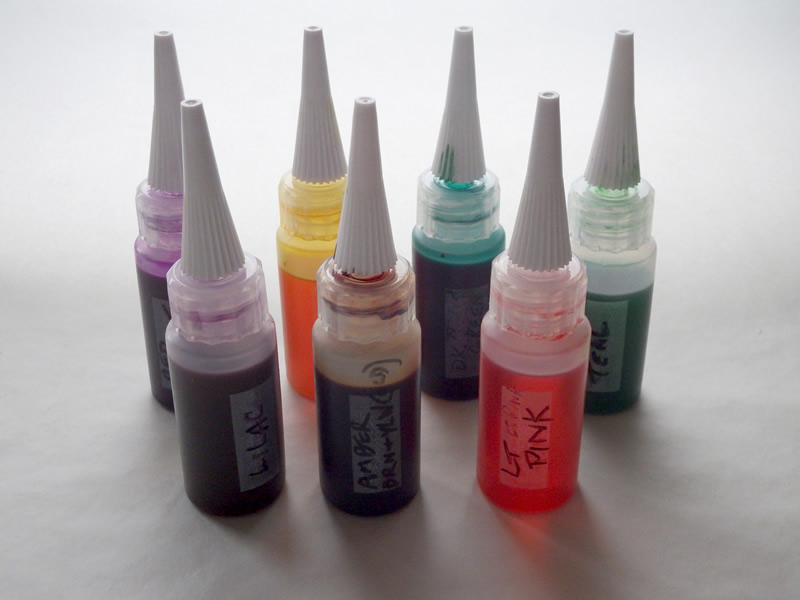
Bottles – 1 oz. bottles with “needle tip” applicator (24) $14
Total – $34
For the total cost, I would have been able to buy about 9 bottles (.5 oz each or or a total of 4.5 ounces of ink). These supplies made 23 colors in 1 oz bottles (I decided not to make gray) – 23 ounces. That’s just over 5 times as much for the money!
The videos call for 2 ounces alcohol, so what I made is twice as strong. This worked out well, since even at double-strength, some of the colors seemed a little weak. Fine with me… I’m going for the muted colors of sea glass. If I’d used the amounts called for in the videos, I’d have 10 times as much ink rather than only 5 times as much.
Other supplies I didn’t include in the cost because I had them on hand:
Disposable Plastic Gloves
Tweezers – with a long, bent tip. The unusual tip isn’t essential, but it was helpful.
Needle-nosed Pliers
Small jars (baby food size) – you must know somebody with a baby. I soaked the filters in clean, used 4 oz. containers that I had from making creams and lotions and was so glad to give them another life. If you make bread, yeast jars are about the same size.
Clean, empty cat food or tuna cans could work, if you had something to cover them with while they soak. You probably don’t want to be wallowing in alcohol fumes for hours.
Helpful Hints
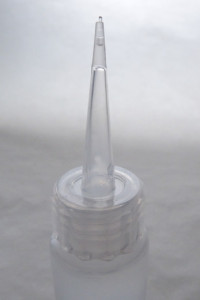
Bottles – the tips of bottles I got from Amazon were a bit inconsistent. They’re like caulking cartridges, where you cut more or less off the tip to determine the size of the opening.
The top of the air space was in different places and it was difficult to try to work around that by cutting just short of that space and then puncture them with a needle (so drops would all be the same size).
It isn’t a rant about meticulous manufacturing, but if you cut slightly too low, which is tough to judge, it can get messy.
Some of the caps were also be leaky. I put some masking tape around the threads inside the cap to make it a bit more snug, like using plumber’s tape with pipes.
Gloves – definitely wear them, but you won’t make as much of a mess or need them quite so badly if you use…
Tweezers – I happen to have a pair of tweezers with a long bent tip. They may have come from a batch of old dental tools I recycled for printmaking years ago. They made this job so much cleaner.
I used them to separate the inner filter from the colored plastic piece that holds the nib and to hold the filter steady while I cut it in half to fit in the jar of alcohol.
Needle-nose pliers – between the tweezers and these, my hands barely came in contact with the Sharpies.
I pulled the nib (very easy) and the colored piece of plastic the nib sits in (not so easy) out with them. That plastic piece can stick and need some coaxing. A firm grip with the pliers, the gray tube in your other hand and maybe some twisting/tugging should do the job.
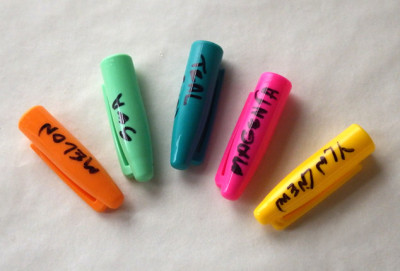 Markers – the ones I used, even though they were from the same set as in the videos, didn’t have color names written on the body or packaging.
I kept the caps and wrote a name that I made up (in Sharpie, of course) on each one, heavily influenced by childhood crayon names. I matched this to the color chart I made for the inks, so that if I ran out of a color that I loved, I could take the cap to a store and hopefully find it again.
Color Chart
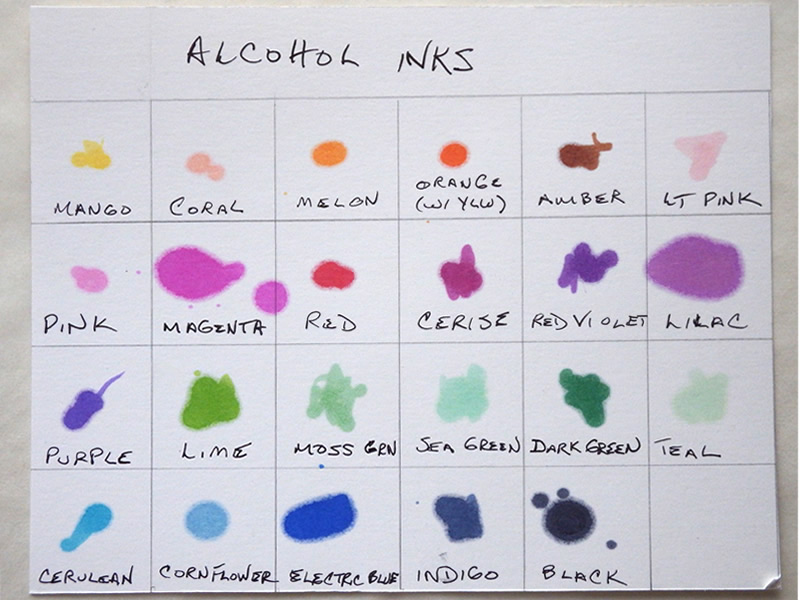
I made this for reference, since looking at the bottle doesn’t give you a whole lot of help – all the purples look the same, for example.
Next Stop
The plan is to make test pieces from polymer clay, so I can judge how the color in the ink bottle or what I see on the chart changes as it’s mixed with the clay then baked.
Stay tuned.